
5 Things We Can Learn About Setting Up a Kitchen from This Diagram
What’s the best way to set up a kitchen? If you’ve been cooking for any length of time, you’ve either figured this out for yourself, in your own kitchen — or you are still looking for that magic solution. This diagram might not be how your kitchen actually looks, but the way it divvies up the space is useful information for any kitchen. We’ve learned five ways from this diagram and you may apply them to your kitchen – no matter its size or shape.
What to Consider When Planning Out a Kitchen
If you’ve ever planned out a kitchen, or even just read enough cooking blogs, you’ve no doubt heard of the kitchen work triangle (the idea that in an ideal kitchen, the line drawn between the refrigerator, range, and sink creates a triangle within which the cook can easily and efficiently move about).
But some say it’s more useful nowadays, given the variety of kitchen sizes and arrangements, to think not in terms of a triangle, but in terms of work zones. You probably can’t change the placement of the refrigerator, or where the sink is in your kitchen, but you can change your relation to these spaces and what you choose to store and set up in their vicinity.
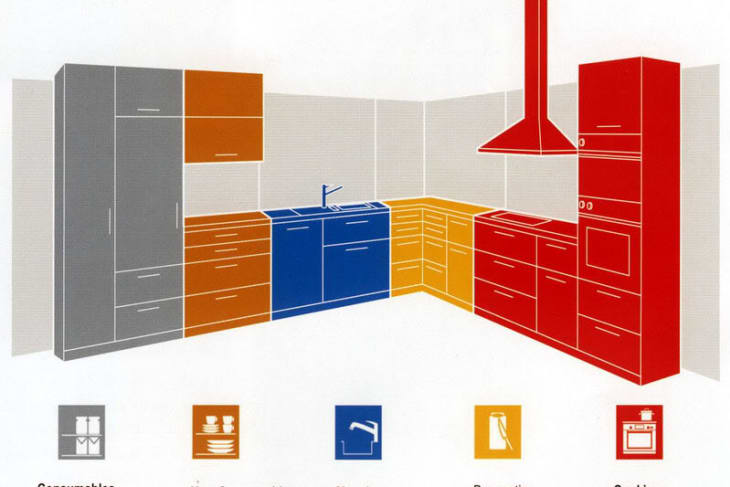
1. Divide your kitchen into five zones.
The basic work zones to think about in your kitchen are as follows:
- Consumables zone: The area used to store most of your food. This may actually be split into two zones: one for your refrigerator (fresh food) and one for your pantry or food cabinets (dry goods, oils, etc.).
- Non-consumables zone: The area used to store everyday dishes, including plates, bowls, glasses, and silverware.
- Cleaning zone: The area that contains the sink and dishwasher (if you have one).
- Preparation zone: The area where most of your kitchen prep happens. This may be a stretch of countertop, or a kitchen island.
- Cooking zone: The area that contains the stovetop, oven, or range, and possibly the microwave.
Most kitchens can be divvied up into these areas. Even if you have a tiny apartment galley kitchen, you still probably have the essentials: a fridge (consumables zone), some cabinets (non-consumables zone), a sink (cleaning zone), a little countertop space (preparation zone), and a stove (cooking zone). Once you’ve mapped out your zones, you’re ready for the next step.
2. Store items as close to their related zone as possible.
The point of dividing your kitchen into zones is so you can store things in the right place to improve your cooking flow! For example, knives, mixing bowls, chopping boards, spices, and other prep utensils should be stored where you do most of your prep work, in the preparation zone. Cooking utensils, pots, pans, and bakeware should be stored as close to or near the stove or oven, in the cooking zone.
3. Store your everyday dishes in the cabinet closest to the sink or dishwasher.
Digging into the details on this a little more, this diagram notes you should store your everyday dishes (the non-consumables) right next to the cleaning area, or where your sink and dishwasher are.
This makes a lot of sense when you think about it. What are you normally unloading from the dishwasher? All your everyday plates, glasses, and silverware! So whatever cabinet is closest to your dish rack or dishwasher, that’s where you should store your dishes if possible.
4. Create prep space as close to the stove as possible.
Another thing we noticed in this diagram is how the prep area is situated next to the stove. We agree. In The Kitchn Cookbook, we note that one of the most important things in setting up a kitchen is to have adequate counter space close to the stove. Ideally you shouldn’t have to take more than a few steps to put your prepped food into a pot on your stovetop, or in the oven.
If you don’t have a lot of existing countertop space next to your stove, this is where you need to get creative! Whatever space you do have, clear it off and prioritize it as a prep space. Remove the microwave and move the fruit bowl! You need that space to chop vegetables or mix ingredients, so let it be just that.
When that’s still not enough, you might consider adding a small kitchen island like IKEA’s GROLAND island, an over-the-sink cutting board, or a burner cover — all of which are great, accessible choices when you need more workspace.
5. Just do your best!
Of course, keeping items precisely within their zone isn’t always entirely possible if your kitchen is tiny and you need to, say, store your bakeware on top of the cabinets, or the only available pantry space is in a cabinet across the room from the fridge. But this idea of seeing your kitchen as a collection of zones and grouping things together by their purpose is something to work towards! There will always be exceptions unless you have a perfect kitchen. (Does anyone?)
What did you notice about this diagram? Have any other thoughts about the best way to set up, arrange, and organize a kitchen?